Introduction
Mintone Admin is a webapp template for admin dashboards and control panels. It is a responsive HTML template that is based on the CSS framework Bootstrap 4.0. It utilizes all of the Bootstrap components in its design and re-styles many commonly used plugins to create a consistent design that can be used as a user interface for backend applications.
Installation
mintone-html + plugins (Required) = done.Template Structure
All template files have fixed structure consisting of .topbar, .left-sidebar,
.page-wrapper

Begining of Page
Below code is used at the beginning of all HTML pages.
<!DOCTYPE html>
<html lang="en">
<head>
<meta charset="utf-8">
<meta http-equiv="X-UA-Compatible" content="IE=edge">
<!-- Tell the browser to be responsive to screen width -->
<meta name="viewport" content="width=device-width, initial-scale=1">
<meta name="description" content="Admin Mintone">
<meta name="author" content="Admin Mintone">
<!-- Favicon icon -->
<link rel="icon" type="image/png" sizes="16x16" href="assets/imgs/favicon.png">
<title>Admin Mintone - Bootstrap 4 Admin Template</title>
<!-- Bootstrap Core CSS -->
<link href="plugins/vendors/bootstrap/css/bootstrap.min.css" rel="stylesheet">

<link href="assets/css/style.css" rel="stylesheet">
<link href="assets/css/responsive.css" rel="stylesheet">
<!-- HTML5 Shim and Respond.js IE8 support of HTML5 elements and media queries -->
<!-- WARNING: Respond.js doesn't work if you view the page via file:// -->
<!--[if lt IE 9]>
   <script src="https://oss.maxcdn.com/libs/html5shiv/3.7.0/html5shiv.js"></script>
   <script src="https://oss.maxcdn.com/libs/respond.js/1.4.2/respond.min.js"></script>
<![endif]-->
</head>
Preloader (Spinner)
Below code is used to load spinner for the template.
<!-- Preloader -->
<div class="preloader">
    <div class="loader">
        <div class="loader__figure"></div>
        <p class="loader__label">Admin Mintone</p>
    </div>
</div>
Logo
Below code is used for logo. You can change it by text or image or icon. If your image height is bigger than 60px, you need to resize your logo or give height="60" to your logo img tag.
 <a class="navbar-brand" href="index.html">
     <!-- Logo icon -->
     <b>
     <!--You can put here icon as well //  //-->
     <!-- Dark Logo icon -->
     <img src="assets/imgs/logo-icon.png" alt="homepage" class="dark-logo"/>
     <!-- Light Logo icon -->
     <img src="assets/imgs/logo-light-icon.png" alt="homepage" class="light-logo"/>
     </b>
     <!--End Logo icon -->
     <!-- Logo text -->
     <span>
     <!-- dark Logo text -->
     <img src="assets/imgs/logo-text.png" alt="homepage" class="dark-logo dark-logo2"/>
     <!-- Light Logo text -->
     <img src="assets/imgs/logo-light-text.png" class="light-logo" alt="homepage"/>
     </span>
  </a>
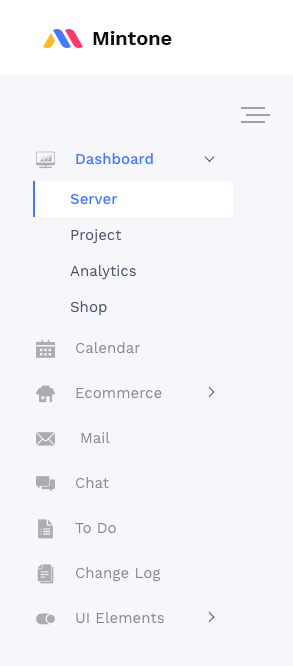
Left Sidebar Menu
Below code is used for left sidebar menu
 <!-- ============================================================== -->
 <!-- Left Sidebar - style you can find in sidebar.scss  -->
 <!-- ============================================================== -->
 <div class="container">
 <aside class="left-sidebar">
 <ul class="nav-bar navbar-inverse hidden-xs-down">
    <li class="nav-item">
        <a class="nav-link navbar-toggler sidebartoggler  waves-effect waves-dark float-right" href="javascript:void(0)">
            <span class="navbar-toggler-icon"></span>
        </a>
   </li>
 </ul>
 <!-- Sidebar scroll-->
 <div class="scroll-sidebar">
 <!-- Sidebar navigation-->
 <nav class="sidebar-nav">
    <ul id="sidebarnav">
          <li class="clearfix"></li>
          <li class="active">
             <a class="has-arrow waves-effect waves-dark" href="#" aria-expanded="false">
                 <i class="flaticon-desktop-computer-screen-with-rising-graph"></i>
                 <span class="hide-menu">Dashboard</span>
             </a>
             <ul aria-expanded="false" class="collapse in">
                <li><a href="index.html" class="active">Server</a></li>
                <li><a href="index-projects.html">Project</a></li>
                <li><a href="index-analytics.html">Analytics</a></li>
                <li><a href="index-shop.html">Shop</a></li>
              </ul>
           </li>
           <li><a href="calendar.html"><i class="flaticon-calendar"></i><span class="hide-menu">Calendar</span></a></li>
           <li><a class="has-arrow waves-effect waves-dark" href="#" aria-expanded="false"><i class="flaticon-restaurant"></i><span class="hide-menu">Ecommerce</span></a>
             <ul aria-expanded="false" class="collapse">
               <li><a href="ecommerce-dashboard.html">Dashboard</a></li>
               <li><a href="ecommerce-pro-list.html">Product List</a></li>
               <li><a href="ecommerce-add-new.html">Add new product</a></li>
               <li><a href="ecommerce-orders.html">Orders</a></li>
               <li><a href="ecommerce-invoice.html">Invoice</a></li>
               <li><a href="ecommerce-customers.html">Customers</a></li>
             </ul>
           </li>
           <li><a href="email.html"><i class="flaticon-mail"></i><span class="hide-menu">Mail</span></a></li>
           <li><a href="chats.html"><i class="flaticon-speech"></i><span class="hide-menu">Chat</span></a></li>
           <li><a href="to-do.html"><i class="flaticon-forms"></i><span class="hide-menu">To Do</span></a></li>
           <li><a href="change-log.html"><i class="flaticon-file"></i><span class="hide-menu">Change Log</span></a></li>
           <li><a class="has-arrow waves-effect waves-dark" href="#" aria-expanded="false"><i class="flaticon-switch"></i><span class="hide-menu">UI Elements</span></a>
             <ul aria-expanded="false" class="collapse">
               <li><a href="ui-profile.html">Profile</a></li>
               <li><a href="ui-typography.html">Typography</a></li>
               <li><a href="ui-buttons.html">Buttons</a></li>
               <li><a href="ui-forms.html">Forms</a></li>
               <li><a href="ui-icons.html">Icons</a></li>
               <li><a href="ui-components.html">Components</a></li>
               <li><a href="ui-cards.html">Cards</a></li>
               <li><a href="ui-pricing-tables.html">Pricing tables</a></li>
               <li><a href="ui-timeline.html">Timeline</a></li>
               <li><a href="ui-charts.html">Charts</a></li>
               <li><a href="ui-tables.html">Tables</a></li>
             </ul>
           </li>
         </ul>
       </nav>
     <!-- End Sidebar navigation -->
     </div>
   <!-- End Sidebar scroll-->
   </aside>

 <!-- ============================================================== -->
 <!-- End Left Sidebar - style you can find in sidebar.scss  -->
 <!-- ============================================================== -->
Font Family
Change the font family of template by simply changing the google font url in assets/css/style.css.
@import url('https://fonts.googleapis.com/css?family=Work+Sans:400,500,600,700,800,900');
add font-family: 'Work Sans', sans-serif; to body in css.
Folder Structure
                  Root
                  ├──
                  │  └── mintone-html/
                  │       └── assets/
                  │             └── css/
                  |             └── imgs/
                  │             └── js/
                  │             └── scss/
                  │       └── plugins/
                  │             └── vendors
                  │                 └── All Required plugins files
                  └──
Html Structure
<html>

<body class="fix-header fix-sidebar card-no-border">

<!-- ============================================================== -->
<!-- Preloader - style you can find in spinners.css -->
<!-- ============================================================== -->
<div class="preloader">
    <div class="loader">
        <div class="loader__figure"></div>
        <p class="loader__label">Admin Mintone</p>
    </div>
</div>

<!-- ============================================================== -->
<!-- Main wrapper - style you can find in pages.scss -->
<!-- ============================================================== -->
<div id="main-wrapper">

    <!-- ============================================================== -->
    <!-- Container1140px -->
    <!-- ============================================================== -->
    <!-- ============================================================== -->
    <!-- Topbar header - style you can find in pages.scss -->
    <!-- ============================================================== -->
    <header class="topbar">
        <div Class="container">
            <nav class="navbar top-navbar navbar-expand-md navbar-light">
        </div>
    </header>

    <!-- ============================================================== -->
    <!-- End Topbar header -->
    <!-- ============================================================== -->
    <!-- ============================================================== -->
    <!-- Left Sidebar - style you can find in sidebar.scss  -->
    <!-- ============================================================== -->
    <div class="container">
        <aside class="left-sidebar">

        <!-- ============================================================== -->
        <!-- End Left Sidebar - style you can find in sidebar.scss  -->
        <!-- ============================================================== -->
        <!-- ============================================================== -->
        <!-- Page wrapper  -->
        <!-- ============================================================== -->
        <div class="page-wrapper">

    </div>
</div>
</body>
<html>
Laravel Version
The laravel versions of Mintone Admin webapp template is a beautiful implementation of the template into laravel app. There are 3 variations in laravel app which can be used as per requirement:
- Lite: It replaces current login, register, forgot password and reset password pages and adds new theme pages with assets.
-
Advance: Lite version with added
Social Login,CRUD Builder,Laravel Logs,User management. -
Full: The ultimate version which is an amalgamation of all the
features of advance version as well as
Blog feature.
Lite Version
This version of Mintone theme consists of basic laravel blade files, middleware, assets and
route
files. It replaces current login, register, forgot password and reset password pages and
adds
new theme pages with assets. All you need to do is just copy-paste folders.
Here is
the
folder structure :
                Root
                |──
                | public
                |     └── All plugin assets file
                | resources
                |     └── All view files
                | routes
                |     └── web.php
                └──
Installation:
Following are the steps you need to follow to apply this theme to your existing laravel project
- Unzip mintone-lite.zip
- Copy all folders to your project directory
- Follow this step if you want to configure your user table for twitter login. Open
database/migrations/2014_10_12_000000_create_users_table.phpand or your user table migration find
$table->string('email')->unique();
and replace it with this code$table->string('email')->nullable()->unique(); - And you are ready to go! Static routes are given in web.php, you can also modify it according to your requirements.
Advance Version
This version of Mintone theme contains CRUD Generator, Laravel Logs,
Role and Permissions management, all static theme pages and so many other features. You
can generate models, routes, controllers and views with CRUD Generator.
Laravel Logs gives detailed error viewing functionality and
Users Management allows you to add,edit,update delete users. Besides these,
you can also create, edit, update, delete Roles and Permissions.
Full Version
This version of Mintone theme is an amalgamation of all the features of advance version as well as Blog feature. Here, users and admin can add, edit, view and delete blogs. Admin can give permissions to user for add, edit, view, delete according to user role. Blogs will be displayed directly on home page as well as on dashboard in blog menu.
Installation:
- Unzip
Mintone-advance.zipfor advance version ormintone-full.zipfor full version. - Go to this folder application using
cdcommand on your cmd or terminal - Run
composer installon your cmd or terminal - Copy
.env.examplefile to.envon the root folder. You can typecopy .env.example .envwhile using command prompt Windows orcp .env.example .envwhile using terminal, Ubuntu - Open your
.envfile and change the database name (DB_DATABASE) to your specific database, username (DB_USERNAME) and password (DB_PASSWORD) field corresponding to your configuration.
By default, the username isrootand you can leave the password field empty. (This is for Xampp)
By default, the username isrootand password is alsoroot. (This is for Lamp) - Run
php artisan key:generate - Follow this step if you want to configure your user table for twitter login. Open
database/migrations/2014_10_12_000000_create_users_table.phpand or your user table migration find
$table->string('email')->unique();
and replace it with this code$table->string('email')->nullable()->unique();
- Run
php artisan migrate - Run
php artisan db:seed(It will generate default admin and user data) - Run
php artisan serve - And you are ready to go! Static routes are given in web.php you can modify it according to your requirements.
- Go to localhost:8000 to visit your theme
- Default credentials for Login:
For Admin => Email :admin@admin.comPassword:password123
For User => Email :user@user.comPassword:password123
Customise Assets
Checkout following laravel blade template structure. As you can see you can add custom assets between @push and @endpush.
@extends('layouts.app')
 <!-- ============================================================== -->
 <!-- layouts.app is a master file which contains all common assets  -->
 <!--             and properties to be share in all pages            -->
 <!-- ============================================================== -->

@push('before-css')
 <!-- ============================================================== -->
 <!--   You can list here all the css file which you want to load    -->
 <!-- before  default css files of theme.  Or can write custom CSS   -->
 <!-- ============================================================== -->
@endpush

@push('after-css')
 <!-- ================================================================ -->
 <!-- You can list here all the css file which you want to load after  -->
 <!--   default css files of theme or overwrite default theme css or   -->
 <!--                   you can write custom CSS                       -->
 <!-- ================================================================ -->
@endpush

@section('content')
    <div class="container-fluid">
    <!--  ============================== -->
    <!--  Here goes the page content     -->
    <!-- ==============================  -->
    </div>
@endsection

@push('js')
 <!-- ==================================================================== -->
 <!--    You can list here all the javascript file which you want to load  -->
 <!-- after default js files of theme. Or can write custom javascript code -->
 <!-- ===================================================================  -->
@endpush
CRUD Generator
This functionality is featured in Advance as well as Full version of Mintone Admin theme. CRUD builder helps in creating Create, Read, Update and Delete for given Model name. You can specify icon for that amd you can also add this to sidebar menu. It provides various options for setting up routes and creating seperate folders for views as well as controller. Check out screenshot below for further understanding.

Logs
This functionality is featured in Advance as well as Full version of Mintone Admin theme. It has two types: 1. Laravel Logs and 2. Activity Logs. Let's understand the difference:
Laravel log stores detailed information regarding all the errors occurred in run time. Basically it is graphic version of Laravel log. You can view, delete and download these logs.

Activity Log tracks all the users login and logged out time. Basically it stores all the sessions and shows in a table format for easy understanding. You can also search and sort records according to your requirement.

Credits
- Bootstrap
- Jquery
- Font-Awesome
- Sweet-Alert
- Full Calendar
- Bootstrap-timepicker
- Bootstrap Colorpicker
- Select2
- Datatables
- Morris
- Sparkline
- Gmaps
- Vector Maps
- Unsplash (images)
- Themify-icons
- Switchery
- Bootstrap select
- Bootstrap tables
- Chartist chart
- Laravel Framework
- Laravel Admin
- Laravel Activity Log
- Laravel Permissions
- Log Viewer
- Socialite